| ||||||||||||||||||||||||||||||||||||||||||||||||||||||||||||||||||||||||||||||||||||||||||||||||||||||||||||||||||||||||||||||||||||||||||||||||||||||||||||||||||||||||||||||||||||||||||||||||||||||||||||||||||||||||||||||||||||||||||||||||||||||||||||||||
Friday, 8 November 2013
What is IP Address?

Thursday, 17 October 2013
How To Set Up a Network Router
This
guide explains how to set up a router for
home computer networks. The exact names of configuration settings on a network
router vary depending on the model and whether it is wired or wireless.
However, this general procedure will guide you through the process for the
common kinds of home network equipment.


Difficulty:Average
Time
Required: 1 hour
Here's
How:
1.
Choose a convenient location to
begin installing your router such as an open floor space or table. This does
not need to be the permanent location of the device. Particularly for wireless
routers, you may find it necessary to re-position the unit after installing it
as the cables / signals may not reach all areas needed. At the beginning, its
better to choose a location where it's easiest to work with the router and
worry about final placement later.
2.
Plug in the router's electrical power source, then turn on the
router by pushing the power button.
3.
(Optional) Connect your Internet modem to the router.
Most network modems connect via an Ethernet cable but USB connections are becoming increasingly
common. The cable plugs into the router jack named "WAN" or
"uplink" or "Internet." After connecting the cable, be sure
to power cycle (turn off and turn back on) the modem to ensure the router recognizes
it.
4.
Connect one computer to the router. Even
if the router is a wireless model, connect this first computer to the router
via a network cable. Using a cable during router installation ensures the
maximum reliability of the equipment. Once a wireless router installation is
complete, the computer can be changed over to a wireless connection if desired.
5.
Open the router's administration tool. From
the computer connected to the router, first open your Web browser. Then enter
the router's address for network administration in the Web address field and
hit return to reach the router's home page.
Many routers are reached by either the Web address
"http://192.168.1.1" or "http://192.168.0.1" Consult your
router's documentation to determine the exact address for your model. Note that
you do not need a working Internet connection for this step.
6.
Log in to the router. The
router's home page will ask you for a username and password. Both are provided
in the router's documentation. You should change the router's password for
security reasons, but do this after the installation is complete to avoid
unnecessary complications during the basic setup.
7.
If you want your router to connect to the Internet, you must enter
Internet connection informationinto that section of the router's
configuration (exact location varies). If using DSL Internet, you may need to enter the PPPoE username and password. Likewise, if
you have been issued a static IP address by your provider (you would
need to have requested it), the static IP fields (including network mask and
gateway) given to you by the provider must also must be set in the router.
8.
If you were using a primary computer or an older network router
to connect to the Internet, your provider may require you to update the
MAC address of the router with the MAC address of the device you were using
previously. Read How to Change a MAC Address for a
detailed description of this process.
9.
If this is a wireless router, change the network name (often
called SSID). While the router comes to you with a
network name set at the factory, you will never want to use this name on your
network. Read How to Change the Router SSID for
detailed instructions.
10. Verify
the network connection is working between your one
computer and the router. To do this, you must confirmed that the computer has
received IP address information from the router. See How to Find IP Addresses for a
description of this process.
11. (If
applicable) Verify your one computer can connect to the Internet properly.
Open your Web browser and visit a few Internet sites such as
http://teamseducation.blogspot.in
12. Connect
additional computers to the router as needed. If
connecting wirelessly, ensure the network name (SSID) of each is computer
matches that of the router.
13. Finally, configure
additional network security features as desired to guard your systems
against Internet attackers. These WiFi Home Network Security Tips offer a
good checklist to follow.
Tips:
1.
When connecting devices with network cables, be sure each end of
the cable connects tightly. Loose cables are one of the most common sources of
network setup problems.
What
You Need
·
A network router (wireless or wired)
·
Network adapters installed on all devices to be connected to the
router
·
A working Internet modem (optional)
·
A Web browser installed at least one computer in the network
Friday, 11 October 2013
How to Use Proxy IP address ? Change the Ip address
What is the Use of The Proxy?
Hide your IP. Browse the Internet anonymously.
100 percentage working process list
Share
Here is the list of proxy server address. use it and enjoy.
94.125.27.20:8080
93.91.200.146:8080
81.18.116.66:8080
79.125.28.242:3128
72.52.96.9:80
72.52.96.11:80
69.13.229.214:3128
68.96.75.146:9090
64.87.46.57:3128
64.23.156.82:8080
62.142.57.72:8080
61.79.87.93:3128
61.6.163.30:8080
61.244.235.34:3128
61.156.25.222:8080
58.215.78.157:808
58.17.71.121:8080
41.190.16.17:8080
222.77.69.210:3128
217.197.121.188:8080
216.27.81.163:8080
216.185.4.200:8080
213.192.246.133:80
213.192.246.133:80
213.192.246.130:80
213.192.246.130:80
213.151.33.58:3128
213.151.033.058:3128
213.109.130.80:54321
212.158.160.96:80
212.118.224.151:80
212.118.224.151:80
212.118.224.150:80
212.118.224.150:80
212.118.224.148:80
211.138.124.232:80
211.138.124.232:80
211.138.124.217:80
211.138.124.213:80
211.138.124.212:80
211.138.124.209:80
211.138.124.200:80
211.138.124.199:80
211.138.124.199:80
211.138.124.180:80
211.138.124.179:80
211.138.124.178:80
211.138.124.174:80
211.138.124.173:80
211.138.124.170:80
211.138.124.169:80
211.138.124.167:80
210.212.55.194:3128
210.187.51.43:8080
210.125.51.41:80
210.107.100.251:8080
209.203.19.2:8080
208.92.249.118:80
208.115.60.146:8080
208.100.40.46:80
208.100.40.46:80
208.100.40.43:80
208.100.40.42:80
207.135.129.5:8080
207.135.129.5:8080
206.196.111.110:80
205.213.195.70:8080
203.139.145.2:3128
202.201.34.101:3128
202.169.226.208:8080
202.162.192.232:8080
202.149.25.43:8080
202.143.146.205:8080
202.115.12.162:808
201.76.211.246:8080
201.20.18.165:3128
200.57.88.164:80
200.36.104.230:8080
200.36.104.230:8080
200.101.82.4:8088
199.3.183.242:8088
196.30.6.186:80
196.29.161.85:8080
196.29.161.84:8080
196.29.161.84:80
196.29.161.82:80
196.29.161.81:80
190.202.124.18:3128
190.141.4.5:8080
190.128.169.122:3128
190.120.10.71:3128
189.72.251.166:8080
189.61.196.10:3128
189.45.245.126:3128
189.17.118.10:3128
189.114.58.242:3128
189.11.211.237:3128
188.59.252.190:80
188.165.205.62:80
187.87.203.209:3128
187.45.232.176:8080
187.45.232.176:8000
187.45.213.100:3128
187.115.162.6:3128
187.115.162.6:3128
184.73.50.88:8118
184.73.131.27:80
184.73.120.223:80
184.73.114.189:8080
184.73.114.189:3128
184.72.9.242:8080
184.72.9.242:8000
184.72.9.242:80
184.72.9.242:443
184.72.9.242:3128
184.106.242.128:80
175.106.17.229:8080
174.143.202.39:80
174.143.168.38:8081
174.142.40.86:3128
174.142.40.84:3128
173.203.78.165:8080
173.203.78.165:3128
168.216.38.209:8080
164.78.252.24:80
164.78.252.24:80
164.078.252.110:80
164.078.252.025:80
125.95.189.82:8080
125.21.227.206:80
122.228.202.236:3128
122.184.133.210:8080
122.183.136.59:80
121.30.255.38:8080
120.50.57.234:3128
119.167.219.78:80
119.167.219.078:80
119.110.97.28:3128
119.110.97.28:3128
118.98.212.242:3128
118.98.160.99:80
118.98.160.99:3128
118.97.224.2:8080
118.97.224.2:8080
118.97.224.2:80
118.97.224.2:3128
118.97.169.173:8080
118.69.127.34:3128
117.40.29.89:80
111.1.32.93:80
111.1.32.92:80
111.1.32.91:80
111.1.32.8:80
111.1.32.7:80
111.1.32.72:80
111.1.32.71:80
111.1.32.69:80
111.1.32.61:80
111.1.32.59:80
111.1.32.4:80
111.1.32.47:80
111.1.32.45:80
111.1.32.44:80
111.1.32.19:80
111.1.32.15:80
110.164.66.98:3128
087.224.133.108:8080
082.206.129.160:3128
061.079.087.093:3128
058.056.108.114:80
How to Use?
Mozilla is the famous browser. So i will explain how to use the proxy servers in Mozilla.
Open Mozilla FireFox.
Select Tools from menu bar (or simply press ALT+T)
Click the Options
Small window Will Open.
Navigate to Advanced tab
Click Settings.
Now select the Manual Proxy Configuration Radio Button.
Paste the one of the Ip address of Proxy server and set the Port as defined in the list.
For Eg:
Let's take this proxy
058.056.108.114:80
Here ip address is 058.056.108.114
Port no is :80
That's all click ok.
Hide your IP. Browse the Internet anonymously.
100 percentage working process list
Share
Here is the list of proxy server address. use it and enjoy.
94.125.27.20:8080
93.91.200.146:8080
81.18.116.66:8080
79.125.28.242:3128
72.52.96.9:80
72.52.96.11:80
69.13.229.214:3128
68.96.75.146:9090
64.87.46.57:3128
64.23.156.82:8080
62.142.57.72:8080
61.79.87.93:3128
61.6.163.30:8080
61.244.235.34:3128
61.156.25.222:8080
58.215.78.157:808
58.17.71.121:8080
41.190.16.17:8080
222.77.69.210:3128
217.197.121.188:8080
216.27.81.163:8080
216.185.4.200:8080
213.192.246.133:80
213.192.246.133:80
213.192.246.130:80
213.192.246.130:80
213.151.33.58:3128
213.151.033.058:3128
213.109.130.80:54321
212.158.160.96:80
212.118.224.151:80
212.118.224.151:80
212.118.224.150:80
212.118.224.150:80
212.118.224.148:80
211.138.124.232:80
211.138.124.232:80
211.138.124.217:80
211.138.124.213:80
211.138.124.212:80
211.138.124.209:80
211.138.124.200:80
211.138.124.199:80
211.138.124.199:80
211.138.124.180:80
211.138.124.179:80
211.138.124.178:80
211.138.124.174:80
211.138.124.173:80
211.138.124.170:80
211.138.124.169:80
211.138.124.167:80
210.212.55.194:3128
210.187.51.43:8080
210.125.51.41:80
210.107.100.251:8080
209.203.19.2:8080
208.92.249.118:80
208.115.60.146:8080
208.100.40.46:80
208.100.40.46:80
208.100.40.43:80
208.100.40.42:80
207.135.129.5:8080
207.135.129.5:8080
206.196.111.110:80
205.213.195.70:8080
203.139.145.2:3128
202.201.34.101:3128
202.169.226.208:8080
202.162.192.232:8080
202.149.25.43:8080
202.143.146.205:8080
202.115.12.162:808
201.76.211.246:8080
201.20.18.165:3128
200.57.88.164:80
200.36.104.230:8080
200.36.104.230:8080
200.101.82.4:8088
199.3.183.242:8088
196.30.6.186:80
196.29.161.85:8080
196.29.161.84:8080
196.29.161.84:80
196.29.161.82:80
196.29.161.81:80
190.202.124.18:3128
190.141.4.5:8080
190.128.169.122:3128
190.120.10.71:3128
189.72.251.166:8080
189.61.196.10:3128
189.45.245.126:3128
189.17.118.10:3128
189.114.58.242:3128
189.11.211.237:3128
188.59.252.190:80
188.165.205.62:80
187.87.203.209:3128
187.45.232.176:8080
187.45.232.176:8000
187.45.213.100:3128
187.115.162.6:3128
187.115.162.6:3128
184.73.50.88:8118
184.73.131.27:80
184.73.120.223:80
184.73.114.189:8080
184.73.114.189:3128
184.72.9.242:8080
184.72.9.242:8000
184.72.9.242:80
184.72.9.242:443
184.72.9.242:3128
184.106.242.128:80
175.106.17.229:8080
174.143.202.39:80
174.143.168.38:8081
174.142.40.86:3128
174.142.40.84:3128
173.203.78.165:8080
173.203.78.165:3128
168.216.38.209:8080
164.78.252.24:80
164.78.252.24:80
164.078.252.110:80
164.078.252.025:80
125.95.189.82:8080
125.21.227.206:80
122.228.202.236:3128
122.184.133.210:8080
122.183.136.59:80
121.30.255.38:8080
120.50.57.234:3128
119.167.219.78:80
119.167.219.078:80
119.110.97.28:3128
119.110.97.28:3128
118.98.212.242:3128
118.98.160.99:80
118.98.160.99:3128
118.97.224.2:8080
118.97.224.2:8080
118.97.224.2:80
118.97.224.2:3128
118.97.169.173:8080
118.69.127.34:3128
117.40.29.89:80
111.1.32.93:80
111.1.32.92:80
111.1.32.91:80
111.1.32.8:80
111.1.32.7:80
111.1.32.72:80
111.1.32.71:80
111.1.32.69:80
111.1.32.61:80
111.1.32.59:80
111.1.32.4:80
111.1.32.47:80
111.1.32.45:80
111.1.32.44:80
111.1.32.19:80
111.1.32.15:80
110.164.66.98:3128
087.224.133.108:8080
082.206.129.160:3128
061.079.087.093:3128
058.056.108.114:80
How to Use?
Mozilla is the famous browser. So i will explain how to use the proxy servers in Mozilla.
Open Mozilla FireFox.
Select Tools from menu bar (or simply press ALT+T)
Click the Options
Small window Will Open.
Navigate to Advanced tab
Click Settings.
Now select the Manual Proxy Configuration Radio Button.
Paste the one of the Ip address of Proxy server and set the Port as defined in the list.
For Eg:
Let's take this proxy
058.056.108.114:80
Here ip address is 058.056.108.114
Port no is :80
That's all click ok.
Thursday, 10 October 2013
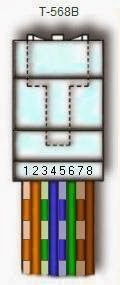
RJ-45 Connector Cabling
RJ-45 connector data cable contains 4
pairs of wires each consists of a solid colored wire and a strip of the same
color. There are two wiring standards for RJ-45 wiring: T-568A and T-568B.
Although there are 4 pairs of wires, 10BaseT/100BaseT Ethernet uses only 2
pairs: Orange and Green. The other two colors (blue and brown) may be used for a second
Ethernet line or for phone connections.
.
 |
To create a straight-through cable,
you'll have to use either T-568A or T-568B on
both ends of the cable. The diagram depicted on the left and right shows clip
of the RJ-45 connector down.
To create a cross-over cable,
you'll wire T-568A on one end and T-568B on
the other end of the cable.
The straight-through
cables are used when connecting Data Terminating Equipment (DTE) to Data
Communications Equipment (DCE), such as computers and routers to modems
(gateways) or hubs (Ethernet Switches). The cross-over cables are used when
connecting DTE to DTE, or DCE to DCE equipment; such as computer to computer,
computer to router; or gateway to hub connections. The DTE equipment
terminates the signal, while DCE equipment do not.
|
 |
|
|
|
|||||||||||||||||||||||||||||||||||||||||||||||||||||||||||||||||||||||||||||
|
||||||||||||||||||||||||||||||||||||||||||||||||||||||||||||||||
Subscribe to:
Posts (Atom)


